Tuesday, October 30, 2012

Create a Fall Arrangement from Nature!

Happy Halloween from Georgia's!

Hi Friends: 

Thanksgiving entertaining is just around the corner and, if you're like me, you're making a list of cooking, cleaning, and decorating to be done. Why not get a jump on the decorating by creating this fall arrangement with elements from nature. It's easy, quick, inexpensive and has a WOW factor! There's a lot of beauty in the fall garden and you can use just about anything with a sturdy stem. Look for bright orange, yellow and red leafy branches, Red Dogwood branches, twigs with berries or seed pods. The most important thing is to have fun with it!
I started with a container lined with sheet moss and packed with dry floral foam.
I covered the floral foam with sheet moss cut to fit the top.
For my arrangement, I used curly willow branches, a few faux fern stems, preserved leafy branches (available at craft stores) and some cotton stems that I brought back from a recent trip to North Carolina.
Start by inserting any tall stems into the foam right through the sheet moss establishing your shape and structure (known as the thriller).
Add a few fern stems to fill in around the base (known as the spiller).
Start adding your leafy element (known as the filler). Be gentle, these stems are brittle.
Finally, add berries or pods - dried lotus pods, okra or thistle would be great. Nature offers so many bold shapes and textures. I used cotton and then filled a bowl with my extra cotton pods. Enjoy!

Sunday, October 28, 2012

Monogram-a-holic!


My name is Nikki and I’m a monogram-a-holic. Not long ago, I was not comfortable talking about my addiction. I tried to hide it from my family and friends; but, when my three favorite letters started popping up on pillows, towels, silver spoons and trays, my husband was quickly on to me.  I think it was the large embroidered “B” on my shower curtain that compelled him to ask – what’s with the obsession? 

The answer was simple.  Monograms and initials, in every form, are beautiful.  They personalize your home, they are great conversation starters, and gosh darn, I just plain love them!
My personal philosophy on monograms follows traditional schools of thought:
  • The monogram in your home should always represent the woman of the house
  • A traditional monogram is:
    • small initial of your first name, large initial of your last name, small initial of your middle or maiden name
I think there is one exception to the rule. I love the idea of embroidering a beautiful "married" monogram on a European size pillow to display in the middle of your bed. Follow this pattern:
    • small initial of wife's first name, large initial of your shared married last name, small initial of husband's first name

 It's a wonderful way to visually depict two becoming one.
Happy monogramming!

Friday, October 26, 2012

Lisa and Nikki's Friday Finds!

What has inspired and delighted us this week? Here they are - the sights, sounds, tastes and one-of-a-kinds we loved!
Waiting for the Great Pumpkin Charlie Brown!
Doesn’t this car’s eyelashes just make you happy?

There was a young woman who lived in a shoe…only in Las Vegas.
Beautiful vintage slate chalkboard – great for the family.
Chewy Chocolate Chip Cookies from Alton Brown.
Ally in her shark costume!

Wednesday, October 24, 2012

Basil Pesto Presto!


Hi friends:

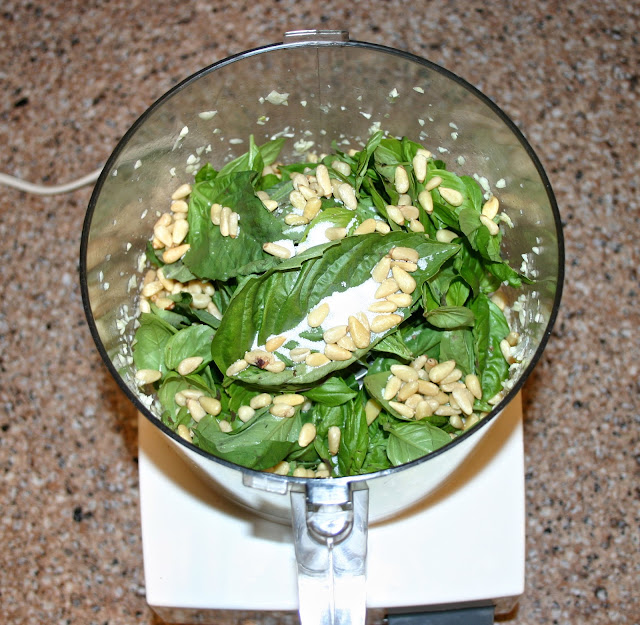
I just plucked the last of my basil out of the garden and decided to end the season with a pesto. My go to recipe comes from Mario Batali and is made with two cheeses, Parmigiano-Reggiano and pecorino romano, for depth of flavor. Additionally, the pecorino melts nicely. This recipe is quick, easy and oh so delicious! Give it a try and, if you get to New York City, don't miss OTTO Enoteca Pizzeria in the West Village, Batali's casual Italian restaurant offering affordable dishes and great wine!
The ingredients:
2 cups fresh basil leaves
1 to 3 garlic cloves, according to taste
3 tablespoons pine nuts
big pinch of sea salt
10 tablespoons of extra virgin olive oil
1/4 cup freshly grated Parmigiano-Reggiano
3 tablespoons grated pecorino romano
Put the garlic into a food processor to chop it. Add the basil, pine nuts and salt and process until finely chopped.
With the motor running, drizzle in the olive oil.
Transfer mixture to a bowl and stir in the cheeses.
Enjoy over hot pasta!

Monday, October 22, 2012

Bring the Cornfield to Your Door!

Beautiful wreath made by A.J. Ackleson for Georgia's!

While meandering through Ohio this weekend, I passed through a quaint little town where the streets were lined with homes decked out in Fall finery. There were pumpkins, gourds, haystacks, cornstalks, scarecrows...it was really charming. But one house in particular caught my eye!     
This was a "stop the car!" moment for me. I just loved this wreath! The size and free form of the corn husks really appealed to me. I had to have one. I knocked on the door, but there was no answer. As I was leaving, the lady of the house walked up the sidewalk and I asked her about it. She said that she had gotten it at an antique market and that she, too, loved it's size and style. Over the next three hours of driving, as I passed cornfield after cornfield, I decided I would buy some cornstalks and try to make one. Here is what I came up with for under $20 and, if I do say so myself, it turned out great!
You need three bundles of cornstalks for this project in order to have a good selection of leafy parts.
Gather supplies: straw wreath form, twine or wire, clippers, scissors, florist greening pins and wreath hanger.
Start by determining the approximate diameter you want the finished wreath to be. This is important to know in order to determine the length of the cornstalk pieces to cut. Then, using your clippers, cut the top leafy parts of 4 to 5 stalks and tie them on the wreath form.
Continue to cut and bundle cornstalk sections attaching each bundle by wrapping tightly with twine and forming a clove hitch knot (or a knot of your choice) before adding the next bundle.
To add fluff to each bundle, pull off individual husks from the base of the stalk and add them to the 4 or 5 stalk tops. 
The wreath is starting to take shape. Beware, it gets big!
The finished product! It definitely makes a statement don't you think?
A little something for the squirrels!

Friday, October 19, 2012

Lisa and Nikki's Friday Finds!


What has inspired and delighted us this week? Here they are - the sights, sounds, tastes and one-of-a-kinds we loved!

Beautiful wildflowers growing all along the interstate in North Carolina.
 Jim holding the pumpkin we cut at a pumpkin farm in the Blue Ridge Mountains.
Nikki's mouthwatering cherry turnover from Whole Foods. Nothing better on a Sunday morning!
I am still getting tomatoes in mid-October in Chicago!
Sara Groves - I Saw What I Saw - So Moving!

Celebrate life, love and live in the moment!

Related Posts Plugin for WordPress, Blogger...